Assuming we have multiple docker containers running in the local environment. To get the details setup please see the previous article Managing multiple docker containers in the local environment and eventually implement CI/CD. In this article, we are taking these containers to the next level. We are going to integrate CI/CD to these containers, so each time we make any changes to the codebase, the Travis CI will test our codebase and on success, will deploy the app to the AWS Elastic Beanstalk.
Solution Approach for Multi-container Continuous Integration
Before starting, make sure, you have cloned or download the latest codebase from here.
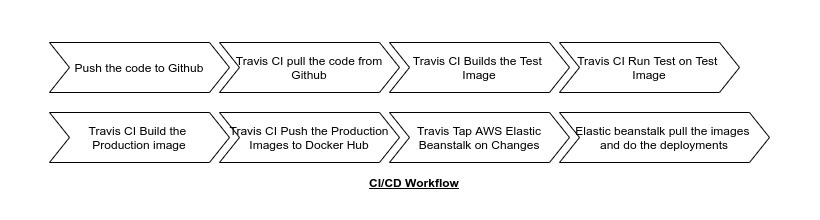
We already got our development environment for multiple environments. To implement the continuous integration, we can do the following steps,
- Make sure, the codebase is already in the
Githubrepository Travis CIwill pull the codeTravis CIwill build the test image, run the tests and remove the test imageTravis CIwill build the production imageTravis CIwill push the image toDocker HubTravis CIwill notifyElastic Beanstalkthat the image is being uploaded toDocker HubElastic Beanstalkwill pull the image from theDocker Hub, run the container and serve web request
Worker Process Production Dockerfile
For production, in the worker process, we will use a very similar configuration of the development config. The only change will be the start-up command of the container.
First, go to the worker directory and create a Dockerfile,
cd worker
touch DockerfileOur production version of Dockerfile should look like the followings,
FROM node:14.14.0-alpine
WORKDIR '/app'
COPY ./package.json ./
RUN npm install
COPY . .
CMD ["npm", "run", "start"]Code language: JavaScript (javascript)
Production API Dockerfile
For production, like previous worker process, our Dockerfile will be similar to the Dockerfile.dev except the container startup command.
So, go to the server directory and create a Dockerfile,
cd server
touch Dockerfile
And our Dockerfile for API should be the following,
FROM node:14.14.0-alpine
WORKDIR '/app'
COPY ./package.json ./
RUN npm install
COPY . .
CMD ["npm", "run", "start"]Code language: JavaScript (javascript)
Nginx Server Production Dockerfile
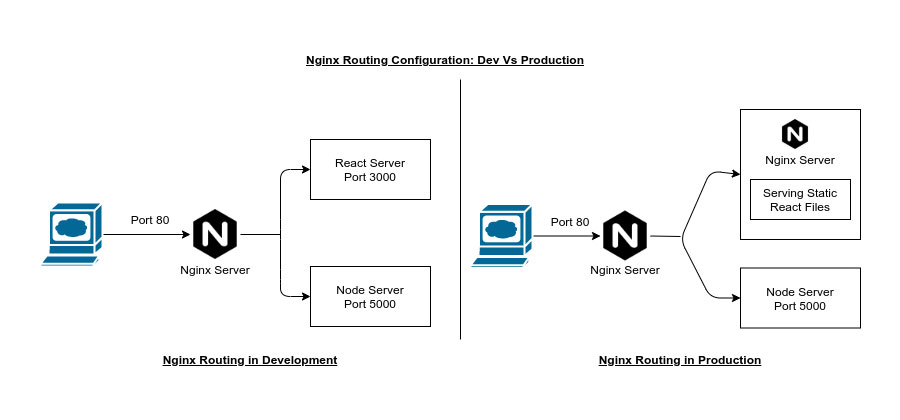
Sometimes, our docker configuration for both development and production will be the same. It’s always good practice to use separate files for development and production. For our Nginx server, since both development and production docker config file, is same, we will just copy the Dockerfile.dev to Dockerfile.
cd nginx
cp Dockerfile.dev DockerfileCode language: CSS (css)
Since we have a route for handling socket connection in development phase, which is not required in the production, We might consider a separate config file for nginx server.
Dockerfile For React App
For the react we will make use of a separate nginx file. We can definitely use our existing nginx, but to make the application more robust and independent, we will use another one.
In the client directory, create a folder named nginx and a file default.conf,
cd client
mkdir nginx
cd nginx
touch default.confCode language: JavaScript (javascript)
Our default.conf file should be,
server {
  listen 3000;

  location / {
    root /usr/share/nginx/html;
    index index.html index.htm;
    try_files $uri $uri/ /index.html;
  }
}Code language: PHP (php)
Now we have to create the production version of our react application Dockerfile. Go to the client directory and create Dockerfile,
cd client
touch Dockerfile
Our production version of Dockerfile will be,
FROM node:alpine as builder
WORKDIR '/app'
COPY ./package.json ./
RUN npm install
COPY . .
RUN npm run build

FROM nginx
EXPOSE 3000
COPY ./nginx/default.conf /etc/nginx/conf.d/default.conf
COPY --from=builder /app/build /usr/share/nginx/htmlCode language: JavaScript (javascript)
In the react application, if we try to run the test, it will throw an error. The reason is in the test file App.test.js, we are testing if the App the component can render without any crash.
This test flow do the followings,
- First, try to render the
Appcomponent Appcomponent try to render theCalccomponentCalccomponent try to invoke the express server
Since our express server is not running, this will throw an error. In real application, we might simulate an face api response. in this case, we can keep a dummy test execution by removing the following 3 lines from App.test.js,
const { getByText } = render(<App />);
const linkElement = getByText(/learn react/i);
expect(linkElement).toBeInTheDocument();Code language: JavaScript (javascript)
Our App.test.js file will look like the following,
test("renders learn react link", () => {});Code language: PHP (php)Travis CI Setup
We now completely set up the production version of docker for each of the application containers. Now we have to create a GitHub account, push all our code to Github, and then hook it to the Travis CI. Then, in our code, we need a Travis CI configuration file, responsible for
- Build a test image and test code
- Building production image
- Push the production image to
Docker Hub - Notify
Elastic Beanstalkon code changes Elastic Beanstalkwill pull the image and run the containers
First push all the codebase, make sure your GitHub repository is integrated and synced with Travis CI. Now for settings, find and enable the switch button to mark as build project.
Since we have not created the Elastic Beanstalk instance in the AWS, we will not configure that part in the Travis CI for now. Also, we are only doing the test coverage for the react app, not the API or worker service.
Let’s create a Travis CI config file named .travis.yml in the root project directory,
touch .travis.ymlCode language: CSS (css)Our .travis.yml file should be like the following,
sudo: required
services:
  - docker

before_install:
  - docker build -t DOCKER_HUB_USER_NAME/react-test -f ./client/Dockerfile.dev ./client

script:
  - docker run -e CI=true DOCKER_HUB_USER_NAME/react-test npm test -- --coverage

after_success:
  - docker build -t DOCKER_HUB_USER_NAME/multi-client ./client
  - docker build -t DOCKER_HUB_USER_NAME/multi-nginx ./nginx
  - docker build -t DOCKER_HUB_USER_NAME/multi-server ./server
  - docker build -t DOCKER_HUB_USER_NAME/multi-worker ./worker
  - echo "$DOCKER_PASSWORD" | docker login -u "$DOCKER_ID" --password-stdin
  - docker push DOCKER_HUB_USER_NAME/multi-client
  - docker push DOCKER_HUB_USER_NAME/multi-nginx
  - docker push DOCKER_HUB_USER_NAME/multi-server
  - docker push DOCKER_HUB_USER_NAME/multi-workerCode language: PHP (php)
Make sure you replace the DOCKER_HUB_USER_NAME with your own docker hub username.
To access the docker hub to upload the image, we need to put the credentials in the Travis CI environment section.
To set an environment variable, go to Dashboard -> Select Repository -> Options -> Settings -> Environment Variables. In the environment variables section, add the following environment variables,
DOCKER_IDDOCKER_PASSWORD
Now, if e push the codebase to GitHub, the Travis CI should test the react app and pushed the build image to the docker hub.
From the Travis CI we should see, the test is being passed and the images is being deployed to the docker hub.
This complete version of code of continious integration can be found here.
Solution Approach for Multiple container Continuous Deployment
Our Travis CI si already configured to build the image and push the image to the Docker Hub. Now we have to think about how to use these images and deploy them to production. To deploy these image we are going to make use of Elastic Beanstalk.
When we have only one container, the Elastic Beanstalk will automatically build and run the container, we do not have to set up any custom configuration. In the root directory, we just have to take the project files and a Dockerfile and Elastic Beanstalk do the rest.
To put the configuration for Elastic Beanstalk, how our multiple Dockerfile will be treated, we have to create a special config file in the project directory named Dockerrun.aws.json. This config file will define,
- From where the
imagefiles will be pulled - Resources allocated for the
image - Port mapping
- Some associated configurations like handling environment variables
The configurations of Dockerrun.aws.json will be very much similar to the docker-compose.yml configuration.
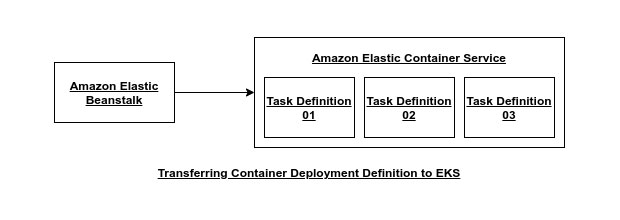
docker-compose.ymlis all about, how we build images, whereasDockerrun.aws.jsonis all about definitions of container.When it comes to handle multiple container, the
Elastic Beanstalkdoes not know, how to handle multiple containers. For multiple container, it delegates the tasks to anotherAWSserver namedElastic Container ServiceakaECS. In theECSfor each container, we will defineTask, also known asTask Definition. A doc for defining the container configuration is given here.
Container Definition
Go to the project root directory and create a file named Dockerrun.aws.json,
touch Dockerrun.aws.jsonCode language: CSS (css)For the Dockerrun.aws.json file, we have to consider the following conventions,
- version : We have to specify the template version. Different version compile differently
- List of containers Definitions
- For each container
- name : Name should be the directory name
- image : Image name that is deployed to the docker hub with the docker hub user name
- hostname : Hostname should be the service name. This is also being used in the nginx configuration
- essential : If this is true, crashing this container will make crash other containers. Among all the container, one should marked as
essential - memory : Need to define the allocated memory in mega bytes, required for a container
- links : To do the routing we have to use the directory name
For the worker and nginx, since no one is routing to these, we do not need any
hostnamein these configuration.Since, the
nginxserver is responsible for communicating with the outside world, we need to do the port mapping.Also, in the
nginxserver configuration we have to specify the routes to other containersIt’s challenging to allocate exactly essential memory for each of the services. Traditionally there are couple of stackoverflow posts, can be used to find out the desired memory allocation.
Our Dockerrun.aws.json should be like the following,
{
  "AWSEBDockerrunVersion": 2,
  "containerDefinitions": [
    {
      "name": "client",
      "image": "DOCKER_HUB_USER_NAME/multi-client",
      "hostname": "client",
      "essential": false,
      "memory": 128
    },
    {
      "name": "server",
      "image": "DOCKER_HUB_USER_NAME/multi-server",
      "hostname": "api",
      "essential": false,
      "memory": 128
    },
    {
      "name": "worker",
      "image": "DOCKER_HUB_USER_NAME/multi-worker",
      "hostname": "worker",
      "essential": false,
      "memory": 128
    },
    {
      "name": "nginx",
      "image": "DOCKER_HUB_USER_NAME/multi-nginx",
      "hostname": "nginx",
      "essential": true,
      "portMappings": [
        {
          "hostPort": 80,
          "containerPort": 80
        }
      ],
      "links": ["client", "server"],
      "memory": 128
    }
  ]
}Code language: JSON / JSON with Comments (json)
Using Managed DB Service in Production
In development, we are using the redis and postgres in our own development machine. But for production, we might need to consider a managed version of redis aka AWS Elastic Cache and for postgres we will make use of AWS Relational Database Service.
Advantages of AWS Elastic Cache and AWS Relational Database Service,
- Managed creation and maintenance
- Easy scaling policy
- Built-in logging
- Better security
- Easy migration
- Multi-AZ configuration
Additionally AWS Relational Database Service has some advantages,
- Database backup and rollback facility
- Easy tuning on Multi-AZ and Read Replicas
Set Up Managed Services
Let’s build our cloud infrastructure to the using manged AWS Services. Along with the AWS Elastic Beanstalk we will make use of
- AWS RDS Instance
- AWS Elastic Cache
Set Up Associated Security Group :
Go to VPC section and from security group create one named multi-docker. The inbound rules should allow a port range of 5432-6379 and source should be the newly created security group multi-docker.
Set Up Elastic Beanstalk :
Go to Elastic Beanstalk service and create an application with the following config
- Name as
multi-docker - Platform as
Docker - Platform Branch as
Multi Container Docker running on 64bit Amazon Linux - After creating the environment, go to configuration and edit instances security by adding the security group
multi-docker
Set Up RDS Postgres Instance :
Go to AWS RDS service and create a database of Postgres instance with the following configuration,
- Identifier as
multi-docker-postgres - Username as
postgres - Master Password as
postgrespassword - Initial database name from the
Additional Settingsshould befibvalues - After the creation of the DB instance, modify the network security by adding a security group
multi-docker
Set Up Elastic Cache Redis Instance :
Go to Elastic Cache service and create a redis instance with the following configuration,
- Name should be
multi-docker-redis - Node type as
cache.t2.microand replicas 0 per shard for less pricing - After creating the instance, from action add the security group
multi-docker
Generate an IAM User With Appropriate Roles :
For simplicity of the IAM user existing policies, search elasticbeanstalk and mark all the services. This will provide an AWS Access Key and AWS Secret Key. This key and secret has to be provided to the Travis cI for invoking the Elastic Beanstalk.
Update Travis CI Config File For Production Deployment
We have left two configs for the production deployment.
- Notify the
Elastic Beanstalk, new changes happening in the codebase - Push the entire project to
Elastic Beanstalk
Although we are pushing the whole codebase to Elastic Beanstalk, the only file ELB care about is, Dockerrun.aws.json.
From Dockerrun.aws.json, ELB download all the images from the docker hub and will run the container.
Our final .travis.yml with deploy, the configuration should look like the following,
sudo: required
services:
  - docker

before_install:
  - docker build -t DOCKER_HUB_USER_NAME/react-test -f ./client/Dockerfile.dev ./client

script:
  - docker run -e CI=true DOCKER_HUB_USER_NAME/react-test npm test -- --coverage

after_success:
  - docker build -t DOCKER_HUB_USER_NAME/multi-client ./client
  - docker build -t DOCKER_HUB_USER_NAME/multi-nginx ./nginx
  - docker build -t DOCKER_HUB_USER_NAME/multi-server ./server
  - docker build -t DOCKER_HUB_USER_NAME/multi-worker ./worker
  - echo "$DOCKER_PASSWORD" | docker login -u "$DOCKER_ID" --password-stdin
  - docker push DOCKER_HUB_USER_NAME/multi-client
  - docker push DOCKER_HUB_USER_NAME/multi-nginx
  - docker push DOCKER_HUB_USER_NAME/multi-server
  - docker push DOCKER_HUB_USER_NAME/multi-worker

deploy:
  provider: elasticbeanstalk
  region: "ap-south-1"
  app: "multi-docker"
  env: "MultiDocker-env"
  bucket_name: "elasticbeanstalk-ap-south-1-366735605679"
  bucket_path: "docker-multi"
  on:
    branch: master
  access_key_id: $AWS_ACCESS_KEY
  secret_access_key: $AWS_SECRET_KEYCode language: PHP (php)
In the Travis CI dashboard, select the environment and from options of the multi-container-ci-cd repository, add the following environment variables,
- AWS_ACCESS_KEY
- AWS_SECRET_KEY
Now we make a commit and push the changed code to the master branch, Travis CI should automatically ensure the continuous integration and Elastic Beanstalk should ensure continuous deployment. After successful deployment, the Elastic Beanstalk the environment should be show Green success check.
Our application should be automatically deployed to the Elastic Beanstalk.
A completed codebase, multiple containers with CI/CD can be found from here.
Cleaning Up AWS Resources
Along the way, we have been using the following services,
- Elastic Beanstalk
- RDS Service
- Elastic Cache (Managed Redis)
- Security Group
- IAM User with necessary permissions
Deleting Elastic Beanstalk :
- Go to the Elastic
Beanstalk Serviceand select themulti-dockerenvironment - From action select the
Terminate Application
Deleting RDS Service :
- Go to
RDSservice - Select the
multi-docker-postgresand from action selectDelete
Deleting Elastic Cache :
- Go to
Elastic Cache - From
redisselect our instancemulti-docker-redis - Select and from action, click the
Deleteoption
Deleting Security Group (Optional) :
- Go to
VPCservice and from left panel selectSecurity Groups - Delete the security group named
multi-dockerand all its associates if there any
Deleting IAM Users (Optional) :
- Go to
IAMservice and delete the user we have created
For security groups, we might not need to delete them, as they are not billing service. Same goes for
IAMuser, it is not included in a billing service, but good to delete if not necessary.
Feel free to leave any comments for clarification, changes, or improvements. Also, you can contact with iXora Solution expert teams for any consultation or coordination from here.
Add a Comment