
Docker makes it easy to manage multiple containers in the local environment. But when it comes to deploying these containers with CI/CD, things can be cloudy. In this article, we will set up multiple containers in the local environment and make sure it will reduce unnecessary complexity during deployment.
Today we are going to make an app that is responsible for generating the square of a number. But instead of writing a simple method, we will take it to the next level and put a couple of complex layers to serve our sole purpose, managing multiple containers in the local environment.
Application Overview
We will have a react application, that will take the input for a user and display the square of the number.
This number will pass to the backend server. We will use an express server in the backend. The express server will save the number in both the Postgres and Redis server. A worker process will be responsible for generating the square number and put the result in the Redis. Finally, we return the response to the react app.
Too much complexity!! We are taking this complexity just to manage multiple containers and find an approach to implement CI/CD.
Application Architecture
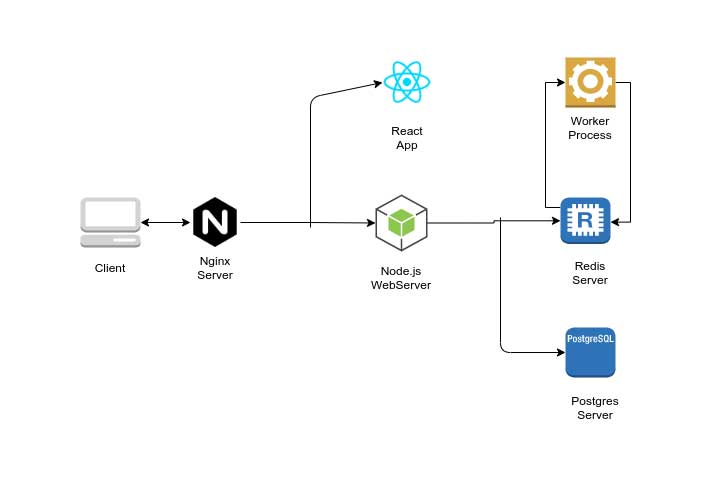
We will have a Nginx server to route the request in both, the react app and the Node.js web app.
Node server will put each number in both Redis server and Postgres server. A worker process will generate the square when we store a number in Redis. It will also store the squared number in the Redis.
React app is responsible for taking the input and displaying the output in the browser.
Boilerplate Code
You will find the boilerplate code to start up from here.
Before goes any further, make sure you clone or download the codebase.
Approach
To make the development process smoother, we will make a development version of each docker container. This will help us not to rebuild the image every time we make changes in the development phase.
For each of the projects, we will set up a pretty similar docker file workflow. For each of the project, we will go through,
- Copy the
package.jsonto the container - Run
npm installto install all the dependencies - Copy everything else
- Volume mapping for hot-reload feature
Docker Dev For React App
First, go to the client directory and create a Dockerfile.dev,
cd client touch Dockerfile.dev Code language: CSS (css)And our Dockerfile.dev should be,
FROM node:alpine
WORKDIR '/app'
COPY ./package.json ./
RUN npm install
COPY . .
CMD ["npm", "run", "start"]
Code language: JavaScript (javascript)
Let’s build an image out of this Dockerfile,
docker build -f Dockerfile.dev .
Code language: CSS (css)
This should build an image and give us a image_id.
Now we can run the react app using the image id,
docker run -it image_id
This should start the development server of our react app. Since we have not port mapping yet, we can not access the site.
Docker Dev For Express Server
Go to the server directory and create a file named Dockerfile.dev,
cd server touch Dockerfile.dev Code language: CSS (css)Our Dockerfile.dev the file should be like following,
FROM node:14.14.0-alpine
WORKDIR '/app'
COPY ./package.json ./
RUN npm install
COPY . .
CMD ["npm", "run", "dev"]
Code language: JavaScript (javascript)
Let’s build an image out of this Dockerfile,
docker build -f Dockerfile.dev .
Code language: CSS (css)
This should build an image and give us a image_id.
Now we can run the react app using the image id,
docker run -it image_id
This should start the express server on port 5000.
Docker Dev For Worker
Go to the worker directory and create a docker-file named Dockerfile.dev,
cd worker touch Dockerfile.dev Code language: CSS (css)Our Dockerfile.dev should be like the following, same as the express server Dockerfile.dev,
FROM node:14.14.0-alpine
WORKDIR '/app'
COPY ./package.json ./
RUN npm install
COPY . .
CMD ["npm", "run", "dev"]
Code language: JavaScript (javascript)
Let’s build an image out of this Dockerfile,
docker build -f Dockerfile.dev .
Code language: CSS (css)
This should build an image and give us a image_id.
Now we can run the react app using the image id,
docker run -it image_id
This should make the worker process standby, so it can listen whenever we insert a message in the redis server.
Adding Postgres, Node.js Server, Worker and Client Service
Now we have a docker file for the client, server, and worker process. Now, we are going to put a docker-compose file to make all the applications startup easier.
Each of the application containers requires different arguments like the express server require a port mapping for port 5000, react app need a port mapping 3000. We also need to make sure the worker process has the access to a Redis server. Also, the express server needs access to redis server and postgres server. Along with these integrations, we have to provide all the environment variables to the container.
To do so, we first integrate the express server with the redis-server and postgres-database. After that, we will connect all other pieces, the Nginx server, react app and worker process.
Let’s create the docker-compose.yml file in the project root directory,
touch docker-compose.yml Code language: CSS (css)Our docker-compose.yml file should be,
version: "3"
services:
  postgres:
    image: "postgres:latest"
    environment:
      - POSTGRES_PASSWORD=postgres_password
  redis:
    image: "redis:latest"
  api:
    build:
      dockerfile: Dockerfile.dev
      context: ./server
    volumes:
      - /app/node_modules
      - ./server:/app
    environment:
      - REDIS_HOST=redis
      - REDIS_PORT=6379
      - PGUSER=postgres
      - PGHOST=postgres
      - PGDATABASE=postgres
      - PGPASSWORD=postgres_password
      - PGPORT=5432
  client:
    stdin_open: true
    build:
      dockerfile: Dockerfile.dev
      context: ./client
    volumes:
      - /app/node_modules
      - ./client:/app
  worker:
    build:
      dockerfile: Dockerfile.dev
      context: ./worker
    volumes:
      - /app/node_modules
      - ./worker:/app
    environment:
      - REDIS_HOST=redis
      - REDIS_PORT=6379 Code language: PHP (php)
We can build and run the container from our root directory by,
docker-compose up --build
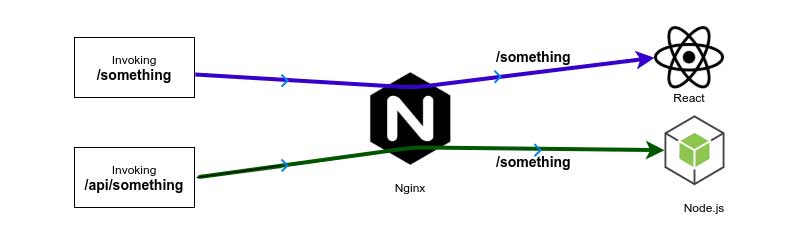
Nginx Configuration
From a browser, we will make a request for static resources and seek API. For react application, we will make the call similar like, /main.js, /index.html. But for server API, we will make a call on endpoints like /api/values/all, /api/values/current etc. You might notice our express server does not have /api as prefix. It has endpoints like /values/all, /values/current.
For API endpoints, start with /api, Nginx will remove the /api part and redirect it to the express server. Other requests will be sent to the react application.
Whenever we create a Nginx server, it will use a configuration file named default.conf. Here in this default.conf file, we have to put a couple of the following information,
- Notify
Nginxthat, we have an upstream server atclient:3000 - Notify
Nginxthat, we have an upstream server atserver:5000 - Both
client:3000andserver:3000should listen to port80 - Add a condition to pass all the
/request toclient:3000 - Add another condition to pass all the
/apirequest toserver:5000
Here client:3000 and server:5000, comes from the service name we are using in the docker-compose file.
Let’s create a directory named nginx inside the root project and create a file default.conf inside the directory.
mkdir nginx
cd nginx
touch default.conf
Code language: JavaScript (javascript)
Our default.conf file should be,
upstream client {
  server client:3000;
}

upstream api {
  server api:5000;
}

server {
  listen 80;

  location / {
    proxy_pass http://client;
  }

  location /api {
    rewrite /api/(.*) /$1 break;
    proxy_pass http://api;
  }
}
Code language: JavaScript (javascript)
In Nginx config
rewrite /api/(.*) /$1 break;means, replace/apiwith$1and$1stands for the matching part(.*)of the url.breakkeyword stands for stopping any other rewriting rules after applying the current one.
Nginx Container
We set up the nginx configuration. Time to set up a docker file for the nginx server.
Go to the nginx directory and create a file named Dockerfile.dev,
cd nginx touch Dockerfile.dev Code language: CSS (css)Our Dockerfile.dev should look like the following,
FROM nginx
COPY ./default.conf /etc/nginx/conf.d/default.conf
Code language: JavaScript (javascript)
That’s pretty much it. The last thing we need to do is adding the nginx service in our docker-compose.yml file.
We need to add the following nginx service to our docker-compose file,
nginx:
  restart: always
  build:
    dockerfile: Dockerfile.dev
    context: ./nginx
  ports:
    - "3050:80" Code language: JavaScript (javascript)
Since our nginx server is do all the routing, no matter what, we want our nginx server up and running. So, we put restart property always. In this case, we also do the port mapping from local machine to the container.
With adding the nginx service to our existing docker-compose, our docker-compose.yml file should be,
version: "3"
services:
  postgres:
    image: "postgres:latest"
    environment:
      - POSTGRES_PASSWORD=postgres_password
  redis:
    image: "redis:latest"
  nginx:
    restart: always
    build:
      dockerfile: Dockerfile.dev
      context: ./nginx
    ports:
      - "3050:80"
  api:
    build:
      dockerfile: Dockerfile.dev
      context: ./server
    volumes:
      - /app/node_modules
      - ./server:/app
    environment:
      - REDIS_HOST=redis
      - REDIS_PORT=6379
      - PGUSER=postgres
      - PGHOST=postgres
      - PGDATABASE=postgres
      - PGPASSWORD=postgres_password
      - PGPORT=5432
  client:
    stdin_open: true
    build:
      dockerfile: Dockerfile.dev
      context: ./client
    volumes:
      - /app/node_modules
      - ./client:/app
  worker:
    build:
      dockerfile: Dockerfile.dev
      context: ./worker
    volumes:
      - /app/node_modules
      - ./worker:/app
    environment:
      - REDIS_HOST=redis
      - REDIS_PORT=6379 Code language: PHP (php)
Now time to start all the containers by,
docker-compose up --build
Most probably, the first time, the server and worker both try to get the Redis instance, even it might not be copied. So In case of any error, we just have to run the container one more time by,
docker-compose up
Now, from the local machine browser, if we go to http://localhost:3050/, we should see the react app, and calculation should work with a manual refresh.
Enable WebSocket Connection
The react application keeps a connection with its development server to maintain a hot reload. Every time there is a source code change, react app listens to these changes via WebSocket connection and reload the web app.
We need to configure the nginx server to enable the WebSocket to handle the issue.
To add a WebSocket connection we need a route in the default.config file,
location /sockjs-node {
    proxy_pass http://client;
    proxy_http_version 1.1;
    proxy_set_header Upgrade $http_upgrade;
    proxy_set_header Connection "Upgrade";
  }
Code language: PHP (php)
So our final configuration for the nginx server will be,
upstream client {
  server client:3000;
}

upstream api {
  server api:5000;
}

server {
  listen 80;

  location / {
    proxy_pass http://client;
  }

  location /sockjs-node {
    proxy_pass http://client;
    proxy_http_version 1.1;
    proxy_set_header Upgrade $http_upgrade;
    proxy_set_header Connection "Upgrade";
  }

  location /api {
    rewrite /api/(.*) /$1 break;
    proxy_pass http://api;
  }
}
Code language: PHP (php)
Now, we can test all the container by running,
docker-compose up --build
Update the UI
Go to client directory and from the /src directory, update the App.js by the followings,
import React from 'react';
import { BrowserRouter as Router, Route } from 'react-router-dom';
import OtherPage from './OtherPage';
import Fib from './Fib';

function App() {
  return (
    <Router>
      <div>
        <Route exact path="/" component={Fib} />
        <Route path="/otherpage" component={OtherPage} />
      </div>
    </Router>
  );
}

export default App;
Code language: JavaScript (javascript)
Our app should be running on http://localhost:3050/.
Go to browser and go to the address http://localhost:3050/. In the input box, put the value 2 and click submit. Now if we reload the web page, the value 4 should appear.
If so, it seems like our app is running smoothly on the development machine as expected.
Find the completed code base from here. If you want to go forward and implement CI/CD with check our next article A hands on guide of implementing CI/CD for multiple docker containers.
Feel free to leave any comments for clarification, changes, or improvements. Also, you can contact with iXora Solution expert teams for any consultation or coordination from here.

Add a Comment