It’s time to put a docker application in the production environment along with CI/CD. First, we look at the step-by-step process without docker. Once we get the bird view of the workflow and get the core design behind the workflow, then we introduce the docker and find how the docker can facilitate everything.
To implement CI/CD, along with docker we will use Travis CI, Nginx server and AWS Elastic Beanstalk.
We will create an application that will use docker and eventually push the application to AWS Elastic Beanstalk. This CI/CD implementation is separated into 3 phase,
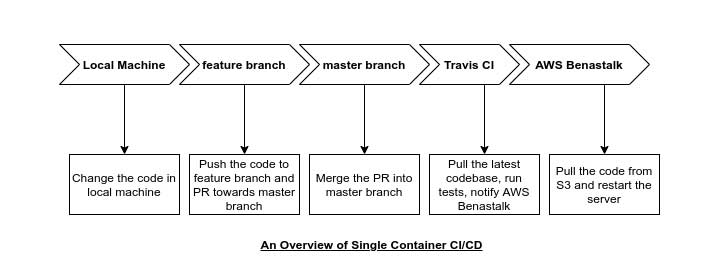
Development Phase: Our dev workflow is starting by creating a git repository. This git repository is going to be the center of coordination of all the code we will write. Out git repository will have two types of branch, master and feature branch. We make changes to the feature branch. By filing a PR, we will merge the feature branch to the master branch. When we do the PR, there will be a series of actions to define how we govern the codebase. The master branch will contain a very clean copy of our codebase.
Test Phase: As soon as we make the PR, the Travis CI will pull the new and updated code and run the test. If all the tests executed successfully, then we will merge the code to the master branch.
Production Phase: After merging the feature branch, Travis CI again pull the codebase and run tests of the code. Any changes on the master branch will eventually and automatically be hosted in the AWS Beanstalk.
Now we need to find out, how docker fits in this place. To execute this workflow, we do not need to make use of Docker. But using docker will make the workflow a lot easier. That’s the sole purpose of docker.
Dockeris not necessarily a requirement, it just make the developers life easier. Again,Dockeris not the focus here, it’s more of utilizing 3rd party services (like,Github,Travis CI,Nginx,AWS Beanstalk) with docker.
Generating a Project
We will use a react app for simplicity. To create a react project, make sure node.js is installed in your system. Then create the project named ix-docker-react by the followings,
npx create-react-app ix-docker-react
This will create the react project and install all the necessary dependencies.
Now go to the project directory,
cd ix-docker-react
To run the test in local machine, we can use
npm run test
To build the application for future deployment, we can build using
npm run build
An finally to run the application in the local environment, we can use
npm run start
Generating Dev Dockerfile
First, go to the project directory. Here we will create a Dockerfile named Dockerfile.dev. The purpose of using .dev with the Dockerfile is to make clear that, this docker file will only be used in the development phase.
In the future, we will use another Dockerfile with simply name Dockerfile, without any extension for our production environment.
So, let’s create the Dockerfile.dev in the project root directory,
touch Dockerfile.dev
Code language: CSS (css)
Inside the Dockerfile.dev we will write a configuration to make our image.
Our Dockerfile.dev will be similar to the following.
# Define base image
FROM node:alpine

# Define working directory inside the container
WORKDIR /app

# Copy the package.json file to the project directory
COPY package.json .
# Install the dependencies
RUN npm install

# Copy all the source code from host machine to the container project directory
COPY . ./

# Start up command of the container to run the server
CMD ["npm", "run", "start"]
Code language: PHP (php)
Building Image From Dockerfile
Since we are not using the default name of Dockerfile, instead we are using Dockerfile.dev, we have to specify the name during the image building command. To do so, we can use -f flag, that helps to specify the dockerfile name. This time, during development, our build instruction will be,
docker build -f Dockerfile.dev .
Code language: CSS (css)
When we initially create our react application using create-react-app, the create-react-app automatically install all the node modules inside the node_modules directory. Now, when we are building the image out of the app, we will again install the dependencies using RUN npm install instruction in the Dockerfile.dev file. We do not need the node_modules in the host machine, it usually increases the duration of the image building process, since we are running the app inside the container. So we can delete the node_modules directory from the host machine.
node_modulesdirectory is not necessary in thehost machineproject directory, it increase the time to build the image. We can deletenode_modulesfrom project directory.
If we again run the previous instruction to build the image, we will get much faster output,
docker build -f Dockerfile.dev .
Code language: CSS (css)
Run Container in Interactive Mode
Now we can run a container from the image by
docker run -it -p 3000:3000 IMAGE_ID
Code language: CSS (css)
If we observe closely, we can notice, while we made changes in the codebase, the hot reloading is not working. The image was built on a snapshot of files. One way is after each change in the codebase we will have to rebuild the image. But this is a costly and inefficient approach. So we need to find a way to enable hot reload inside the image.
Enabling Hot Reload Using Docker Volume
In the last section, if we made changes in a source file and the changes were not reflected in the container. Now we will figure out a way to solve the issue without stopping, rebuild and restart the container.
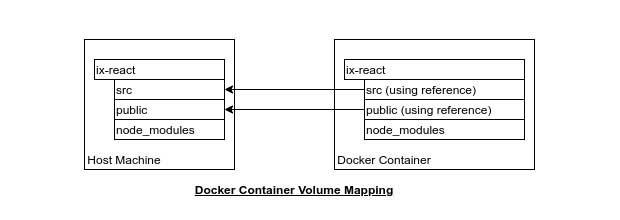
A docker volume is essentially a mapping of the directory between host machine and container.
With docker volume mapping, we can use the reference of local machine directory from the host machine. In this case, we do not copy the source directory of the local machine in the container, instead, use the host machine directory by reference from the container.
To use the volume mapping we need to use the followings,
docker run -p 3000:3000 -v /app/node_modules -v $(pwd):/app image_id
Here we have used two switches. Each switch has a -v flag that is used to set up a volume. The ${pwd} is stands for print working directory, used to get the current application path.
Here the first switch is -v /app/node_modules, is not using the reference. Instead, it says, not to map the /app/node_modules of the host machine.
For the second switch, -v ${pwd}:/app, we are using the host machine volume. The stands, when we use host machine directory as a reference in the docker.
If you face any access error like the following,
EACCES: permission denied, mkdir '/app/node_modules/.cache'
Code language: JavaScript (javascript)
Then resolve the permission issue by running from the project root directory,
sudo chmod a+w node_modules -R
Now rebuild the image and run again.
If the hot reload not work, need to create a .env in the root directory and need to add CHOKIDAR_USEPOLLING=true. The .env file should be
CHOKIDAR_USEPOLLING=true
Code language: JavaScript (javascript)
The shorthand of Docker CLI
The downside of the previous run command is, it is ridiculously long. We have to specify the port-mapping, volume-mapping and also the image id. With docker-compose, we can dramatically shorten the command to run the container in the development phase. Let’s create a docker-compose inside the project directory and encode the port mapping and volume mapping.
First, go to the project root directory and create a file named docker-compose.yml
touch docker-compose.yml
Code language: CSS (css)
Our docker-compose.yml file will be like,
version: "3"
services:
  web:
    stdin_open: true
    build:
      context: .
      dockerfile: Dockerfile.dev
    ports:
      - "3000:3000"
    volumes:
      - /app/node_modules
      - .:/app
Code language: PHP (php)
Executing Test Cases
Now we have a solid development infrastructure for the react application with docker container.
We will focus on running the tests inside the container. First, we run the tests to our development environment and then shift to Travis CI.
The good thing is, running test cases inside the container is very straightforward.
To do so, first, let’s build the image,
docker build -f Dockerfile.dev .
Code language: CSS (css)
Now, to override our container startup command and replace it with the npm run test, we can do,
docker run image_id npm run test
This should run all the test cases for the app. To open the test runner in an interactive mode, we can utilize the -it flag.
docker run -it image_id npm run test
Now the test suite will run in interactive mode.
Live Update Test Cases
If we run the tests in the container and update the test suite, we will notice the test case changes do not impact inside the container.
Maybe you got the reason. Here we created a special container by docker build -f Dockerfile.dev . that take the snapshot of the working files and puts them inside the container. Now, this special temporary container does not have volume mapping set up. So changes inside the files do not impact the test case changes.
To resolve the issue we can take multiple approaches. One is, start the container with docker compose and then run the docker exec to use the web service. Let’s try this one,
From one terminal, run the container with docker-compose
docker-compose up
Now from another terminal, first, take the running container id by
docker ps
From the output, we can get the container_id and run npm run test directly inside the container,
docker exec -it container_id npm run test
This should run the test suite in interactive mode with a live update.
Now, this solution is not as good as it should be.
Here in the docker-compose.yml the file we will add another service, which will be solely responsible for run the test suite whenever we change the files.
We already have a service named web that is responsible for run the web application. Our new service, we can named tests will be responsible for run the test suites. Except for the web service, the tests service do not require the port-mapping, instead, it needs to override the start-up command. In this tests service, the startup command should be npm run test.
Our new docker-compose.yml file will be,
version: "3"
services:
  web:
    stdin_open: true
    build:
      context: .
      dockerfile: Dockerfile.dev
    ports:
      - "3000:3000"
    volumes:
      - /app/node_modules
      - .:/app
  tests:
    build:
      context: .
      dockerfile: Dockerfile.dev
    volumes:
      - /app/node_modules
      - .:/app
    command: ["npm", "run", "test"]
Code language: PHP (php)
Now run the container with a new build
docker-compose up --build
This will run both, the web application and the test suite.
So the bottom line is both approaches have some downside. For the first approach, we have to find out the running container id and remember the docker exec command.
For the second approach, we get the test suite results in the docker log area. Also in this approach, we can get the test suite in an interactive mode.
Nginx in Production Server
In the development phase, we have a development server provided by the create-react-app that handle the request of port 3000. In production, we need a web server whose sole purpose is to respond to a browser requests. In this case, we can use an extremely popular web server Nginx. It’s a minimal server, basically do the routing.
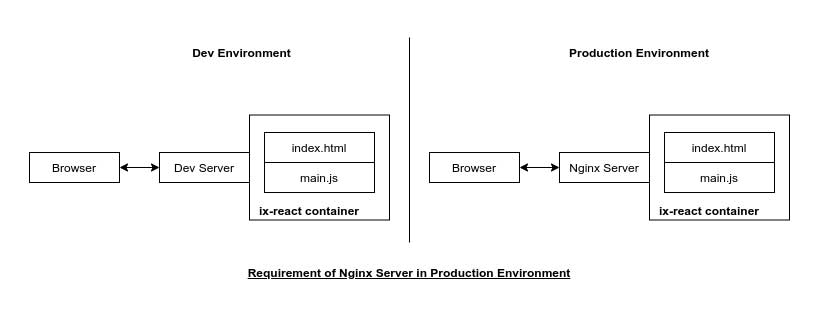
So we create a separate docker file, that will create a production version of the web container. This production version of the docker container will start an instance of Nginx. This Nginx server will be used to serve our index.html and main.js file.
Multi-Step Docker Builds
To use Nginx in the production environment, we will need
- Build Phase (To build the react app)
- Use
Nodebase image - Copy the package.json file
- Install dependencies
- Build the app by
npm run build
- Use
- Run Phase (To run the Nginx server)
- Use
Nginximage - Copy the build file generated in the
build phase - Start the
Nginxserver
- Use
Let’s create a docker file for our production environment,
touch Dockerfile
In the Dockerfile we will have two distinctly different sections. One is for build the app and the second one is to run the Nginx server with build files.
Nginxbase image has already integrated a startup command. We do not explicitly start theNginx Server.
In the Run Phase, when we will use the Nginx using docker, it will automatically remove all files and folder from the Build Phase except the build directory. So our production image will be very small.
Our Dockerfile will be,
FROM node:alpine
WORKDIR '/app'
COPY package.json .
RUN npm install
COPY . .
RUN npm run build

FROM nginx
COPY --from=0 /app/build /usr/share/nginx/html
Code language: JavaScript (javascript)
Now, let’s build the image
docker build .
The end result of the build the command will be an image_id.
To run the container, since Nginx is a web server, we have to do the port mapping. Nginx use 80 as default port.
We can run the container using the following,
docker run -p 8080:80 image_id
Code language: CSS (css)
Now, if we go to http://localhost:8080, we should see the react app running.
So, now we got a docker application, that can build our application and serve the application from a Nginx server. Now we need to ship all our work to the outside world, the deployment.
Setting Up Git Repository
Let’s create a git repository named docker-react.
Please make sure the git repository is public. Off-course, the private repo will work but for private we have to set up a couple of additional configs.
Push all your codebase to the GitHub master branch. Make sure in Github, your react-application source with Dockerfile exist. You can follow the commands,
git init
git add .
git commit -m 'initial commit'
git remote add origin remote_git_repository_address
git push origin master
Code language: JavaScript (javascript)
Setting Up Travis CI
We have not talked about Travis CI a lot. Travis CI essentially set a sky limit for our code base, we can do whatever we want.
When we push some changes to the github, github taps the Travis CI that some code changes. In this case, Travis CI took the code base and do whatever we are asked to. Some developer use Travis CI for test the code base after any changes, someone use the Travis CI to deploy the codebase. In our case, we will use Travis CI for both, Test the codebase and Deploy to the AWS.
To set up Travis CI,
- Sign in
Travis CIwith your GitHub account (For simplicity) - Enable Github App (This will load all your GitHub repo in
Travis CIdashboard) - Find
docker-reactand enable tracking by tapping the switch button
Travis CIui is being changed time to time. If you have trouble finding the green switch button, please click here and tap the button to enable sync.
Now we have to explicitly tell Travis CI what to do when a codebase is being changed. For now, we ignore the AWS Deployment and focus on testing.
We essentially tell Travis CI how to start the Docker, run the test suite and interpret the test result. In order to do so, we will require a file .travis.yml in the project root directory.
Let’s create the file .travis.yml,
touch .travis.yml
Code language: CSS (css)
In the .travis.yml we make sure the super user privilege is being configured. We require the super user privilege for running the docker.
We also specify that we are using the docker, so Travis CI will bring a copy of the Docker.
Finally, we build an image out of the Dockerfile.dev to run our test suite.
In our local machine, after we build the image we used to get the image_id and used the image_id to run the container. In Travis CI, we can not manually copy and paste the image_id, so we can utilize the use of tagging.
Our .travis.yml file should be like the following,
language: generic
sudo: required
services:
  - docker

before_install:
  - docker build -t docker_username/github_repo_name -f Dockerfile.dev

script:
  - docker run -e CI=true docker_username/github_repo_name npm run test -- --coverage
Code language: JavaScript (javascript)
As tag, we can use any name. But its a good practice to use the convention
docker_username/github_repo_nameDefault behaviour of
Jestis run the test for the first time and bring an interactive terminal to run test according to developer input. With-- -- coveragewe can change that default behaviour and the will run once and return status code and terminate.When test results return with status code
0, means test coverage is as expected
Now push the changed codebase to the Github repository.
git add .travis.yml
git commit -m 'Added travis file'
git push origin master
Code language: JavaScript (javascript)
This should trigger the test in the Travis CI. In the dashboard, inside react-docker application, we should see the test suite running and should get passed all the tests.
Now, we have a pipeline in place to automatically watch out our GitHub repository for changes and pull down the source code to run the tests and report back if everything is alright.
Set Up AWS Elastic Beanstalk
Elastic Beanstalk is the easiest way to run Single Container application in AWS Infrastructure.
When we deploy a codebase to AWS Beanstalk using Travis CI, in background, the Travis CI upload a zipped version of the code to the S3 Bucket and tap the Beanstalk to notify there’s a new version of code is being pushed. Then the AWS Beanstalk pull the codebase from the S3 Bucket and redeploy. And good things is, when we create a AWS Elastic Beanstalk environment, this S3 Bucket is being automatically created.
AWS recently update the AWS Elastic Beanstalk that can work with docker compose. By default, when the platform branch is Docker Running on 64bit Linux, then the new feature with docker-compose works. In our case we will make use of vanilla Dockerfile.
When we set a docker environment in the AWS Beanstalk, Beanstalk create a virtual machine that’s sole purpose is to run the docker container we provide. In AWS Beanstalk there is already an built-in load-balancer. So whenever the traffic flows increase, the AWS Beanstalk automatically increase the number of, as well as, our container and react-app inside the container.
Login to your account and select the Elastic Beanstalk service.
Now create an application with the following config,
- The application name can be anything, I am using
docker-react - Platform should be
Docker - Platform branch should be
Docker Running on 64bit Amazon Linux - Platform version as
AWS Recommended, I am using2.16.4
Creating the application environment might take a couple of minutes. After the environment being created, the environment will be listed in the environment section.
Travis Config AWS Deployment
In the deployment config, we will require the following config,
provider, should beelasticbeanstalk, already configured and theTravis CIregion, Where theAWS Elastic Beanstalkis being createdapp, ourElastic Beanstalkapp nameenv, ourElastic Beanstalkenvironment namebucket_name, automatically generated bucket name by theElastic Beanstalkbucket_path, same as theappnameon -> branch, on which branch code changes, we should re-deploy the code basecredentials, to get the credentials to accessElastic BeanstalkbyTravis CI, we have to create a new IAM user with full programmatic access toElastic Beanstalk. For security purpose, we will use theTravis CIenvironment variables to store our AWS access key and secret.
Our new .travis.yml file should be,
language: generic
sudo: required
services:
  - docker

before_install:
  - docker build -t bmshamsnahid/docker-react -f Dockerfile.dev .

script:
  - docker run -e CI=true bmshamsnahid/docker-react npm run test -- --coverage

deploy:
  provider: elasticbeanstalk
  region: "region_name"
  app: "docker-react"
  env: "Dockerreact-env"
  bucket_name: "elasticbeanstalk_bucket_name"
  bucket_path: "docker-react"
  on:
    branch: master
  access_key_id: $AWS_ACCESS_KEY
  secret_access_key: $AWS_SECRET_KEY
Code language: PHP (php)
In the deploy config, the path name of the
S3bucket should be same as the app name.
In the Elastic Beanstalk, it should open port 80 for Nginx. We have to specify the port in the Dockerfile. We can expose a port in the Elastic Beanstalk with Dockerfile by EXPOSE 80. Our new Dockerfile with updated configuration should be
FROM node:alpine
WORKDIR '/app'
COPY package.json .
RUN npm install
COPY . .
RUN npm run build

FROM nginx
EXPOSE 80
COPY --from=0 /app/build /usr/share/nginx/html
Code language: JavaScript (javascript)
Now, if we push the changes to the github, the application should be deployed to the AWS Elastic Beanstalk.
From Elastic Beanstalk we can get the web URL and access our react application.
Now we have a complete CI/CD with Docker, Github, Travis CI and AWS Beanstalk. In a team, engineers will make a commit to the feature branch. Other engineers will review and merge these changes to the master branch. The moment, the codebase is being merged to the master branch, the CI/CD will be triggered and make the deployment.
Cleanup
For the AWS Beanstalk, when we create an environment, the AWS Beanstalk create an EC2 Instance internally. This EC2 Instance is costing money. So after we are done with our experiments, we need to delete the AWS Beanstalk application. We can delete the Beanstalk Application from the dashboard.
Hope this article guided through a single-page application CI/CD using docker, You can get a completed codebase from here.
Feel free to leave any comments for clarification, changes, or improvements. Also, you can contact with iXora Solution expert teams for any consultation or coordination from here.
Add a Comment