docker-compose helps us to avoid repetitive commands, that we might have to write with docker-cli during a container startup.
For example, if we have two container and need networking between them, we have to configure these networking stuff with docker-cli every time we start the container.
Using docker-compose we can resolve these issues.
This
docker-composeallows us to start up multiple container at the same time in a very easy and straightforward way. Also, it will set up some sort of networking between them and all behind the scene.
To make use of docker-compose, we essentially going to get rid of the docker-cli startup commands of long-form and encode these command in docker-compose.yml file. We do not entirely copy and paste the start-up commands, instead, we will use special syntax more or less similar to the start-up commands.
After creating the docker-compose.yml file, we will feed the file to the docker-compose-cli instead of docker-cli to parse the file and create a container with our desired defined configurations.
Installation
In windows and mac OS, the docker-compose is shipped with the docker installation. But for Linux machines, you might need to install the docker-compose library separately. To install the docker-compose in Ubuntu 20.04, we can follow the instructions from StackOverflow.
sudo curl -L "https://github.com/docker/compose/releases/download/1.26.0/docker-compose-$(uname -s)-$(uname -m)" -o /usr/local/bin/docker-compose
sudo mv /usr/local/bin/docker-compose /usr/bin/docker-compose
sudo chmod +x /usr/bin/docker-compose
Code language: JavaScript (javascript)Here, the first instruction download the library, the second one move it to /usr/bin/docker-compose and using the third instruction, we are giving the docker-compose appropriate permissions.
A Hands-On Example
Let’s do a classic docker example.
Here we will create a little docker container that will host a web application. This web application will count the number of visit to that web app.
We will need a node app that will response on the HTTP request and a redis server that will store the number of visits. Although redis is a in memory db-server, in this case, we will consider itself as our tiny primary database.
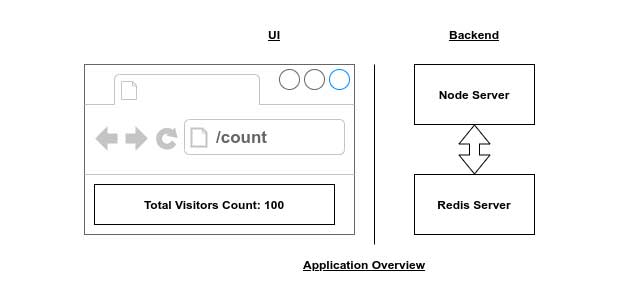
Of course, we can use the node server to store the number of visits. To make the container a little bit complex by adding some networking, we are using both a node server and a redis server.
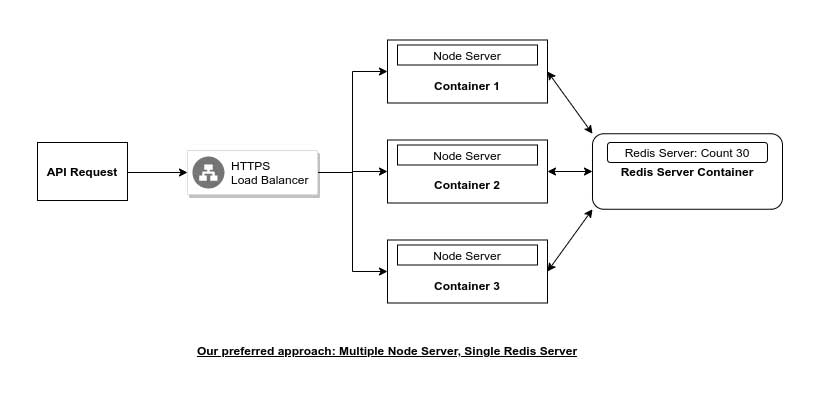
We can consider a single container where both the node server and redis server will be operated. But this will create a problem with scalability. For more traffic, if we increase the number of containers, for each container, there will be individual node server and redis server. Also, each redis server will be isolated from each others. So one redis server will give us a total visit of 10, another redis server will give us a total visit of 5.

So our actual approach will be both node server and redis server will be in an isolated container. An in case of scaling we will scale the node-app-container and all the node-app-container will be connected to the single redis-server-container.
Creating The Node Server
Create a project directory named ix-count-visitor,
mkdir ix-count-visitor
Now go to the directory, create a node project and install express and “ package to run a server,
cd ix-count-visitor
yarn init -y
Our package.json file should be,
{
  "name": "ix-count-visitor",
  "version": "1.0.0",
  "main": "index.js",
  "license": "MIT",
  "dependencies": {
    "express": "^4.17.1",
    "redis": "^3.0.2"
  }
}
Code language: JSON / JSON with Comments (json)
Create a file index.js
touch index.js
Code language: CSS (css)
The index.js will be responsible for creating the node server and connect with the redis server to display the number of site visits in the browser on the response of a HTTP request.
The code of the index.js will be like followings,
// import required modules
const express = require("express");
const redis = require("redis");

const app = express(); // create app instance
const client = redis.createClient({
  host: "redis-server", // service name of the `redis-server` we are using, will be defined in the `services` section of `docker-compose.yml` file
  port: 6379, // default port of the `redis-server`
}); // connect the node server with redis server
client.set("counts", 0); // initially set number of visits to 0

app.get("/", (req, res) => {
  client.get("counts", (err, counts) => {
    res.send(`Number of counts: ${counts}`); // in browser, showing the client, number of visits
    client.set("counts", parseInt(counts) + 1); // increase the number visits
  });
});

const PORT = 8081; // determine node server port no

// run the server
app.listen(PORT, () => console.log(`App is listening on port: ${PORT}`));
Code language: JavaScript (javascript)
We are connection with Redis on line
const client = redis.createClient();
Code language: JavaScript (javascript)
Here we will have to put the necessary networking config of the Redis server.
Assembling Dockerfile to Node Server
Our Dockerfile will be very simple to just run the node server
# define base image
FROM node:alpine

# define working directory inside the container
WORKDIR /app

# Copy the package.json file to the project directory
COPY package.json .
# install all the dependencies
RUN npm install

# Copy all the source code from host machine to the container project directory
COPY . .

# define the start up command of the container to run the server
CMD ["node", "index.js"]
Code language: PHP (php)
Now let’s build the image,
docker build -t docker_user_id/ix_count_visitor:latest .
This will create the image of our node-app named docker_user_id/ix_count_visitor.
Now if we try to run the node-app (Although it will throw error, because redis server is not running yet),
docker run docker_user_id/ix_count_visitor
Here, we will get an error message,
ode:events:356
      throw er; // Unhandled 'error' event
      ^

Error: connect ECONNREFUSED 127.0.0.1:6379
    at TCPConnectWrap.afterConnect [as oncomplete] (node:net:1139:16)
Emitted 'error' event on RedisClient instance at:
    at RedisClient.on_error (/app/node_modules/redis/index.js:406:14)
    at Socket.<anonymous> (/app/node_modules/redis/index.js:279:14)
    at Socket.emit (node:events:379:20)
    at emitErrorNT (node:internal/streams/destroy:188:8)
    at emitErrorCloseNT (node:internal/streams/destroy:153:3)
    at processTicksAndRejections (node:internal/process/task_queues:81:21) {
  errno: -111,
  code: 'ECONNREFUSED',
  syscall: 'connect',
  address: '127.0.0.1',
  port: 6379
}
Code language: JavaScript (javascript)
In summary, it says, the node-app can not connect to the redis-server, as expected. We will fix it now.
Redis Server
We can use vanilla redis image from docker-hub. In a separate terminal, we can simply run the redis-server by
docker run redis
Even with running the redis-server, if we run the node-app again, we will get the same error as before.
Since both node-app and redis-server is an isolated container and there is no networking communication between them, the node-app will not be able to communicate with the redis-server.
Bring The Docker Compose
With docker-compose first, we do the following configurations:
- For
redis-servermake use of theredisimage - For
node-appmake use of theDockerfile - Also, for the
node-appmap port8081from local machine port4001
By defining multiple services in the docker-compose, docker will put all the services essentially the same network. And as a result, the containers can access each other freely.
There are different versions of docker-compose. Here we will use version 3 as our docker-version.
In the docker-compose the redis-server and the node-app are considered as services.
For a service in the docker-compose, we have to define how we get the image. It could be an image from the docker-hub or from the Dockerfile we wrote. For redis-server we will use docker-hub image and for the node-app we will use our made up Dockerfile
Also, For a service, with docker compose we can do the port mapping between local machine and container, can use a restart policy (discussed in later section)
To do so, in the project directory, first, create the docker-compose.yml file
touch docker-compose.yml
Code language: CSS (css)
Now our docker-compose.yml file be
version: "3"
services:
  redis-server:
    image: "redis"
  node-app:
    restart: always
    build: .
    ports:
      - "4001:8081"
Code language: JavaScript (javascript)
We used to run the container by docker run docker_user_id/ix_count_visitor, which is similar to docker-compose up.
We used 2 commands, one for the image and another for run the container. The docker-compose up --build is similar to the followings existing commands,
docker build .
docker run my_image_name
So to build and run our two docker image we can use the followings,
docker-compose up --build
This will
- Run container for
redis-server - Build image for
node-app - Run container for
node-app - Put both containers in the same network
- Start the
redis-servercontainer - Start the
node-appcontainer
In the output, we should see
App is listening on port: 8081
Since we map port 4001 from local machine to 8081 of the host machine, from the browser, we can access the node-app by http://localhost:4001/. If we go to the browser http://localhost:4001/, we should see
Number of Visits: visit_countCode language: JavaScript (javascript)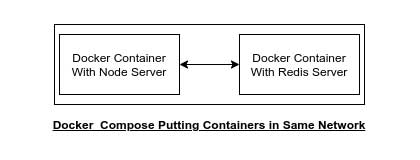
Stop Containers with Docker Compose
With docker-cli we used to run a container background using
docker run -d docker_user_id/ix_count_visitor
To stop the instance, we used
docker stop docker_user_id/ix_count_visitor
With docker-compose, to run the containers in the background, we can use the following command,
docker-compose up -d
Also to stop all the containers using the docker-compose we can use the followings,
docker-compose down
We can verify if the container is stopped or not by docker ps.
Container Maintenance with Docker Compose
It is possible that, out node-server may crash or hang over time. In this case, we might want to restart the server.
In docker-compose there are 4 different restart policy,
- no: Never restart the container, no matter what happens. This is the default restart policy.
- always: If the container stops for any reason, the
docker-composewill restart the server. - on-failure: Only restart the container, if it crashes with an
error-code. - unless-stopped: Always restart the container on crash except for developer forcibly stop it.
We need to put this restart-policy under the service declaration.
In node.js we can exit from the app with process.exit(exit_code). As exit code, we have
0, means everything is okay and we want to exit from the node applicationnon-zero, any value other than0means, there’s something wrong and theerror-codespecifies that issue.
The restart-policy of always work on when it encounters the 0 as error-code.
If we use restart-policy as on-failure, we have to use error-code other than zero.
Finally, If we use unless-stopped as restart-policy, then the container will always restart, unless we (develop) stop in from the terminal.
As restart-policy, if we use no then we have to put no inside a quote. Because in yml file, no is interpreted as false. For other restart-policy like, always, on-failure or unless-stopped we can use plain text without the quote.
Between, always and on-failure use cases, we might 100% time want a public web server restarted on crash. In this case, we use always. If we do some worker process, that is meant to do some specific job and then exit, then thats a good case to use on-failure exit policy.
Checking Container Status With Docker Compose
Traditionally, we used to check the container status using the docker-cli by
docker ps
Docker Compose has a similar command,
docker-compose ps
This command should be executed inside the project directory, where the docker-compose.yml file exists.
So, only the containers defined inside the docker-compose status will be displayed.
Hope this will give you a brief idea of using docker-compose in your local machine. Feel free to leave any comments for clarification, changes, or improvements. Also, you can contact with iXora Solution expert teams for any consultation or coordination from here.
Add a Comment