Almost always, working with docker means, using images of other engineers as a base. Then we put our configurations on the top of these base images and serve our own purpose. This time, I am going to demonstrate, how to bake our own docker image.
To make a docker image developer-friendly, we use tagging on these images. I will also discuss how Docker uses the caching mechanism on image building to provide robust performance.
Create a Custom Image
To create our own image, we have to do the followings,
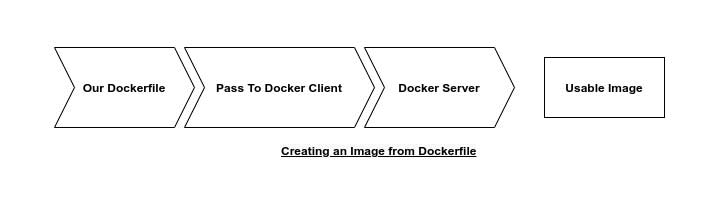
- Create a
dockerfile - Once a
dockerfileis created, we will pass it to thedocker client - This
docker clientwill provide theimageto thedocker server - The
docker-serverwill make theimage. If we push the image to the Docker hub, then other engineers can use it.
A
dockerfileis a plain text file. It contains all the configs along with the startup commands to define how a dockercontainershould behave. It determine what programs should be inside the container and how will these program will work around in thecontainerstar up
For each docker file, we can find the following similar pattern,
- A
base image - Some config to install additional programs and dependencies that are required to create and execute the container program
- A start-up command, that will be executed the moment a container start
Docker serverdoes the most of heavy lifting while creating aimage. It takes the docker file, go through the configuration and build the useableimage
Hands-On
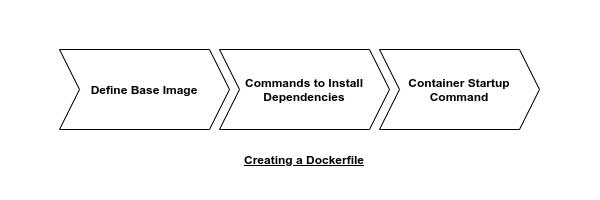
Let’s create our own docker image that will run a redis-server. We will do the following procedures
- Define base
image - Download and install the
dependencies - Instruct the images initial behavior
First, we will go through a couple of commands, codes, and scripts. If that does not make sense, please seat tight, I will explain every single line in the next section.
So,
- First, create a file named
Dockerfiletouch Dockerfile - In the
Dockerfile, add a base imageFROM alpine - Download the dependency
RUN apk add --update redis - Define the initial command
CMD ["redis-server"]
Finally our Dockerfile should be the following
FROM alpine
RUN apk add --update redis
CMD ["redis-server"]
Code language: CSS (css)Now let’s build the container
docker build .
This will create the image and return the image_id.
Now we can run the container from the image_id using the followings,
docker run image_id
This will run the Redis server.
Dockerfileis a plain file with no extension
Dockerfile Teardown
We just going through the process of creating a docker image. But we have not explained what really happens there. Now let’s explain what actually we have done inside the Dockerfile configuration.
We ran 3 commands to build the image, and all three have a very similar pattern. Each command start with FROM, RUN or CMD, called docker instruction and they took some arguments.
The
FROMinstruction specify adocker imagewe want to use as base. While we are preparing our custom image, theRUNexecute some commands. TheCMDspecify, what should run on startup when our image will be used to create a newcontainer.
Every line of configuration we are going to add inside the Dockerfile will always start with an instruction
A base image is an initial set of programs that can be used to to further customize the the image.
Alpineis a base image that comes with a package manager namedapk(Apache Package Manager).apkcan be used to download theredis-serverand install in the system.
With FROM alpine, we are using an initial operating system named alpine. This alpine the operating system has a couple of preinstalled programs, that are very much useful for what we are trying to accomplish. Since we are here to create redis server and we need to install some dependencies, alpine has these tools and programs preinstalled like apk.
With RUN apk add --update redis we download and install the server. Here apk is nothing related to the docker. It’s a dependency manager preinstalled in the base image, download and install the redis server.
The CMD ["redis-server"] ensure, when we create a container from this docker image, the Redis server will be started using redis-server command.
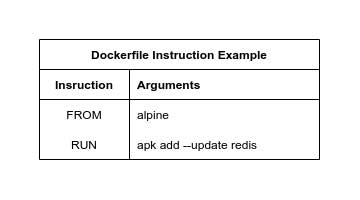
Image build process
To build an image from the Dockerfile, we use
docker build .
This ships our Dockerfile to the docker client. build is responsible for taking the Dockerfile and build an image out of it.
The . is the build context. The build context contains all the set of files and folders that belongs to our project needs to wrap or encapsulate in our docker container.
If we notice the logs of the docker build ., we can see except the first instruction FROM alpine, every other instruction has an intermediary container that being removed automatically.
This means, except for the first step, each step took the container from the previous step, and the step itself acts as the startup instruction. Then when the step is done, it simply passes the updated file system snapshot and removes the temporary container from itself.
For the last step, it took the container from the previous step, and do not run itself as the start-up command. Instead, it only set itself as the first instruction and ensure if someone in the future creates and run the container out of the image, it then executes this last step as the startup instruction.
tldr; For each step, except first one, we take the
imagefrom the previous step, create a temporary container, execute instructions, make changes, took the snapshot of the file system and return the file system output as output, so it can be used as the image for the next step. For last step, the final instruction is considered as thestart-upinstruction of thedocker container.
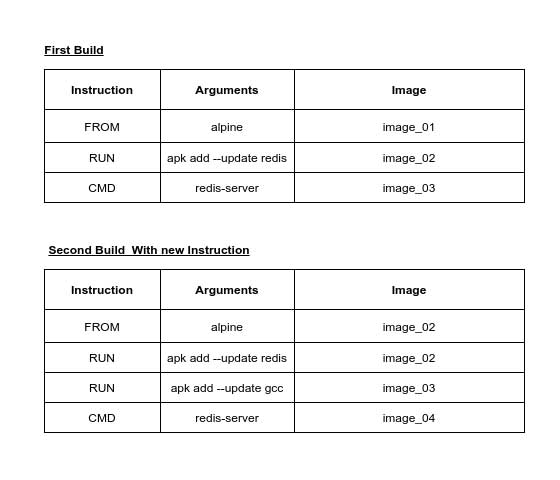
Rebuild image from the cache
Let’s update the Dockerfile with an additional command
RUN apk add --update gcc
Now the Dockerfile should be like
FROM alpine
RUN apk add --update redis
RUN apk add --update gcc
CMD ["redis-server"]
Code language: CSS (css)
Let’s build an image out of this Dockerfile,
docker build .
If we observer the logs closely, we see, in the second step, it does not create a intermediary container from the previous step. Instead, it is using the cache. So we do not need to install the redis-server multiple times. This gives the docker robustness and faster build performance.
From the instruction RUN apk add --update gcc it will create the intermediary container and since the file snapshot is being changed, it will do the same from the next steps.
If we build the image from the same Dockerfile for the 3rd time, it will take all the changes from the cache instead of the intermediary container.
An
intermediary containeris created from the previous step image and use to run current instruction, make changes, take the snapshot of the new changed file system and got removed. This snapshot is being used for the next step to create anotherintermediary containerand goes on.Altering the instruction sequence will not use the cache.
Tagging a docker image
Till now, we have created image from the Dockerfile and getting an image_id.
When we want a name instead of an image_id we can use the tagging.
To get a name, after a image being created, we can use the following
docker build -t user_name/image_name:version_number .
This will return
Successfully tagged user_name/image_name:version_number
Here the
user_nameis theusername, that is used to login to thedocker-hub.image_nameis our desired image name. Theversion_numberis theimageversion number. Instead ofversion_numberwe can uselatestkeyword to use the latest version number handled by the docker itself.
We can now run the docker with the tag
docker run user_name/image_name:version_number
Here only the version_number is the tag itself. The user_name itself is always the docker id and image_name is the project name or the repo name.
While running our tagged custom
imagewe can ignore theversion_number. It will simply take the latest version.
Hope this will give you an idea of how to build a custom image and the mechanism behind it. To learn more you can check out the official Docker tutorial on how to create a base image.
Feel free to leave any comments for clarification, improvements. Also, you can contact with iXora Solution expert teams for any consultation or coordination from here.
Add a Comment