This tutorial teaches the basics of building a web API with the Scala Play Framework.
In this tutorial, you learn how to:
- Create a web API project.
- Add a model class and a database context.
- Create a controller with CRUD methods.
- Configure routing, URL paths, and return values.
- Call the web API with Postman.
In the end, you have a web API that can manage “to-do” items stored in a database.
Overview
This tutorial creates the following API:
| API | Description | Request body | Response body |
| GET /api/todos | Get all to-do items | None | An array of to-do items |
| GET /api/todos/{id} | Get an item by ID | None | To-do item |
| POST /api/todos/add | Add a new item | To-do item | To-do item |
| PUT /api/todos/{id} | Update an existing item | To-do item | None |
| DELETE /api/todos/{id} | Delete an item | None | None |
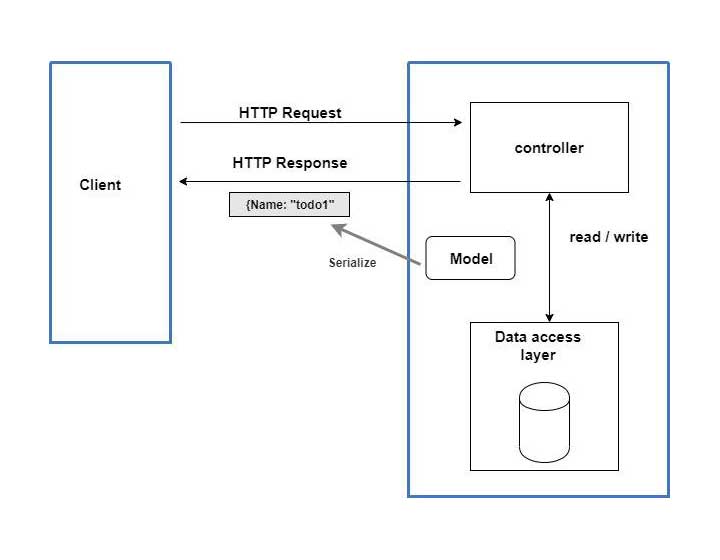
The following diagram shows the architecture of the app.
Prerequisites
- SBT 1.3.3
- Scala 2.13.0
- Play Framework
Create a web project
Open a terminal such as PowerShell.
Navigate to directories (cd) to the folder that will contain the project folder.
Run the following command and respond to the prompts to create a new project template
sbt new playframework/play-scala-seed.g8
name [play-scala-seed]: scala-rest-api-example
organization [com.example]: com.exampleCode language: JavaScript (javascript)A new folder is created named scala-rest-api-example that contains the minimal project template contents.
Navigate to project folder by the following command-
cd scala-rest-api-example
Open the project folder in the visual studio code editor by the following command –
code .Test the APP
The project template creates a basic build for a Scala Play application. It is just a minimal project to start your own application from. From the terminal run following command-
sbt runThis will download dependencies and start the system. In a browser, enter http://localhost:9000 to view the welcome page.

Add a Model
The application manages data by using a set of model classes. In this app, we will need only a single model class. Create a Scala class named Todo.scala
package models

case class Todo(id: Long, name: String, isComplete: Boolean)
Add the controllers
Now it is time to add the API endpoints to which the application will respond. Create a folder named APIs under the controllers. Create a controller class named TodoController.scala
package controllers.api

import javax.inject._
import play.api.mvc._
import play.api.libs.json._
import models.{Todo}

class TodoController @Inject()(
    cc: ControllerComponents
) extends AbstractController(cc) {

    implicit val todoFormat = Json.format[Todo]

    def getAll = Action {
        val todo = new Todo(1, "item 1", false)
        Ok(Json.toJson(todo))
    }
}
Besides the controller, we will need to configure the routes file. Open conf > routes and add the following routes
#  api controllers mapping
GET     /api/todos                  controllers.api.TodoController.getAllCode language: PHP (php)
Test the API
Browse http://localhost:9000/api/todos. Run sbt run command if you have stopped the app in terminal. This should return a JSON response of one todo item

Congrats! We successfully created our API. Let’s modify our app that will read and manipulate data from a real database.
Creating persistent storage using MySql Database
We will use the My-SQL database to store our data. We will also use play slick that is a standard database access framework in Scala.
1. Adding Dependencies
Add the following dependencies in build.sbt file.
libraryDependencies += "mysql" % "mysql-connector-java" % "5.1.41"
libraryDependencies += "com.typesafe.play" %% "play-slick" % "4.0.2"
libraryDependencies += "com.typesafe.play" %% "play-slick-evolutions" % "4.0.2"Code language: JavaScript (javascript)
We will use MYSQL Connector, Play-Slick to connect with the database and play slick evolution for database migrations.
2. Configurations for database connectivity
# Default database configuration using MySQL database engine
# Connect to scalatestdb as testuser
slick.dbs.default.profile = "slick.jdbc.MySQLProfile$"
slick.dbs.default.db.driver = "com.mysql.jdbc.Driver"
slick.dbs.default.db.url = "jdbc:mysql://localhost/scalatestdb"
slick.dbs.default.db.user = "testuser"
slick.dbs.default.db.password="testpass"Code language: PHP (php)
3. Integrate models with slick
We configured and mapped our database. We need to convert our models into slick objects and let the slick map our model classes and tables.
We will map the Todo class. Our case class will have no change, but we need to create another class that tells slick to map. Modify the Todo.scala as followings-
package models
import com.google.inject.Inject
import play.api.data.Form
import play.api.data.Forms.mapping
import play.api.data.Forms._
import play.api.db.slick.{DatabaseConfigProvider, HasDatabaseConfigProvider}
import slick.jdbc.JdbcProfile
import scala.concurrent.{ExecutionContext, Future}
import slick.jdbc.MySQLProfile.api._

case class Todo(id: Long, name: String, isComplete: Boolean)

case class TodoFormData(name: String, isComplete: Boolean)

object TodoForm {
  val form = Form(
    mapping(
      "name" -> nonEmptyText,
      "isComplete" -> boolean
    )(TodoFormData.apply)(TodoFormData.unapply)
  )
}

class TodoTableDef(tag: Tag) extends Table[Todo](tag, "todo") {

  def id = column[Long]("id", O.PrimaryKey, O.AutoInc)
  def name = column[String]("name")
  def isComplete = column[Boolean]("isComplete")

  override def * = (id, name, isComplete) <> (Todo.tupled, Todo.unapply)
}


class TodoList @Inject()(
    protected val dbConfigProvider: DatabaseConfigProvider
)(implicit executionContext: ExecutionContext)
    extends HasDatabaseConfigProvider[JdbcProfile] {

  var todoList = TableQuery[TodoTableDef]

  def add(todoItem: Todo): Future[String] = {
    dbConfig.db
      .run(todoList += todoItem)
      .map(res => "TodoItem successfully added")
      .recover {
        case ex: Exception => {
            printf(ex.getMessage())
            ex.getMessage
        }
      }
  }

  def delete(id: Long): Future[Int] = {
    dbConfig.db.run(todoList.filter(_.id === id).delete)
  }

  def update(todoItem: Todo): Future[Int] = {
    dbConfig.db
      .run(todoList.filter(_.id === todoItem.id)
            .map(x => (x.name, x.isComplete))
            .update(todoItem.name, todoItem.isComplete)
      )
  }

  def get(id: Long): Future[Option[Todo]] = {
    dbConfig.db.run(todoList.filter(_.id === id).result.headOption)
  }

  def listAll: Future[Seq[Todo]] = {
    dbConfig.db.run(todoList.result)
  }
}
Code language: Scala (scala)
4. Add database evolution
Database evolution facilitates migrations when you add new tables and modify any tables or delete something. Our database will be empty for now. Evolution will take care of adding the Todo table.
The evolution scripts should be in directory conf/evolutions/%databaseName% with the name of the scripts starting at 1.sql, incrementing at each evolution. %databaseName% is the default when you use the default database. Play keeps track of which evolutions have already applied in a table called play_evolutions.
Our evolution script in confi/evolutions/default/1.sql
# Todo schema

# --- !Ups
CREATE TABLE IF NOT EXISTS `scalatestdb1`.`todo` (
  `id` INT(11) NOT NULL AUTO_INCREMENT,
  `name` VARCHAR(45) NULL DEFAULT NULL,
  `isComplete` TINYINT(4) NULL DEFAULT NULL,
  PRIMARY KEY (`id`))
AUTO_INCREMENT = 2
DEFAULT CHARACTER SET = utf8

# --- !Downs
drop table 'todo'Code language: PHP (php)
5. Add a service class
We will add an extra service layer that will mediate communication between controller and database using models. The service layer facilitates to add business logic and isolation.
Our service class will only contain simple methods to read and write data. Create a folder named services under the app. Inside service folder create service class named TodoService.scala
package services

import com.google.inject.Inject
import models.{Todo, TodoList}

import scala.concurrent.Future

class TodoService @Inject() (items: TodoList) {

  def addItem(item: Todo): Future[String] = {
    items.add(item)
  }

  def deleteItem(id: Long): Future[Int] = {
    items.delete(id)
  }

  def updateItem(item: Todo): Future[Int] = {
    items.update(item)
  }

  def getItem(id: Long): Future[Option[Todo]] = {
    items.get(id)
  }

  def listAllItems: Future[Seq[Todo]] = {
    items.listAll
  }
}
Update the Controller class to integrate all the methods
In our Todo.scala and TodoService.Scala,we created the following methods
- addItem
- deleteItem
- updateItem
- getItem
- listAllItems
Now modify our API Controller TodoController.scala and create an action method for each of these methods above. Also, add a parameter in the constructor to user TodoService
package controllers.api

import javax.inject._
import play.api.mvc._
import play.api.libs.json._
import models.{Todo, TodoForm}
import play.api.data.FormError

import services.TodoService
import scala.concurrent.ExecutionContext.Implicits.global
import scala.concurrent.Future

class TodoController @Inject()(
    cc: ControllerComponents,
    todoService: TodoService
) extends AbstractController(cc) {

    implicit val todoFormat = Json.format[Todo]

    def getAll() = Action.async { implicit request: Request[AnyContent] =>
        todoService.listAllItems map { items =>
          Ok(Json.toJson(items))
        }
      }

      def getById(id: Long) = Action.async { implicit request: Request[AnyContent] =>
        todoService.getItem(id) map { item =>
          Ok(Json.toJson(item))
        }
      }

      def add() = Action.async { implicit request: Request[AnyContent] =>
        TodoForm.form.bindFromRequest.fold(
          // if any error in submitted data
          errorForm => {
            errorForm.errors.foreach(println)
            Future.successful(BadRequest("Error!"))
          },
          data => {
            val newTodoItem = Todo(0, data.name, data.isComplete)
            todoService.addItem(newTodoItem).map( _ => Redirect(routes.TodoController.getAll))
          })
      }

      def update(id: Long) = Action.async { implicit request: Request[AnyContent] =>
        TodoForm.form.bindFromRequest.fold(
          // if any error in submitted data
          errorForm => {
            errorForm.errors.foreach(println)
            Future.successful(BadRequest("Error!"))
          },
          data => {
            val todoItem = Todo(id, data.name, data.isComplete)
            todoService.updateItem(todoItem).map( _ => Redirect(routes.TodoController.getAll))
          })
      }

      def delete(id: Long) = Action.async { implicit request: Request[AnyContent] =>
        todoService.deleteItem(id) map { res =>
          Redirect(routes.TodosController.getAll)
        }
      }
}Code language: Scala (scala)
Add routes for new methods
We have added new methods to our API. Let’s add routes for all API method
# api controllers mapping
GET     /api/todos                  controllers.api.TodoController.getAll
GET     /api/todos/:id                  controllers.api.TodoController.getById(id: Long)
POST    /api/todos/add              controllers.api.TodoController.add
PUT     /api/todos/update/:id           controllers.api.TodoController.update(id: Long)
DELETE /api/todos/delete/:id         controllers.api.TodoController.delete(id: Long)Code language: PHP (php)
Install new dependencies
We have added some dependencies in our build.sbt. Close the app from terminal. Execute the following command again-
sbt runThis will download dependent packages and run the app.
PLAT WITH IT
Let’s play our app and check the outputs. It should be up and running now.
Examine the Add method
This tutorial uses Postman to test the web API.
- Install Postman
- Start the app from command shell by running sbt run command
- Start Postman
Test Add with Postman
- Create a new request.
- Set the HTTP method to POST
- Select the Body tab.
- Select the raw radio button.
- Set the type to JSON (application/json).
- In the request body enter JSON for a to-do item:
JSONCopy
{
  "name":"walk dog",
  "isComplete":true
}Code language: JavaScript (javascript)
Select Send
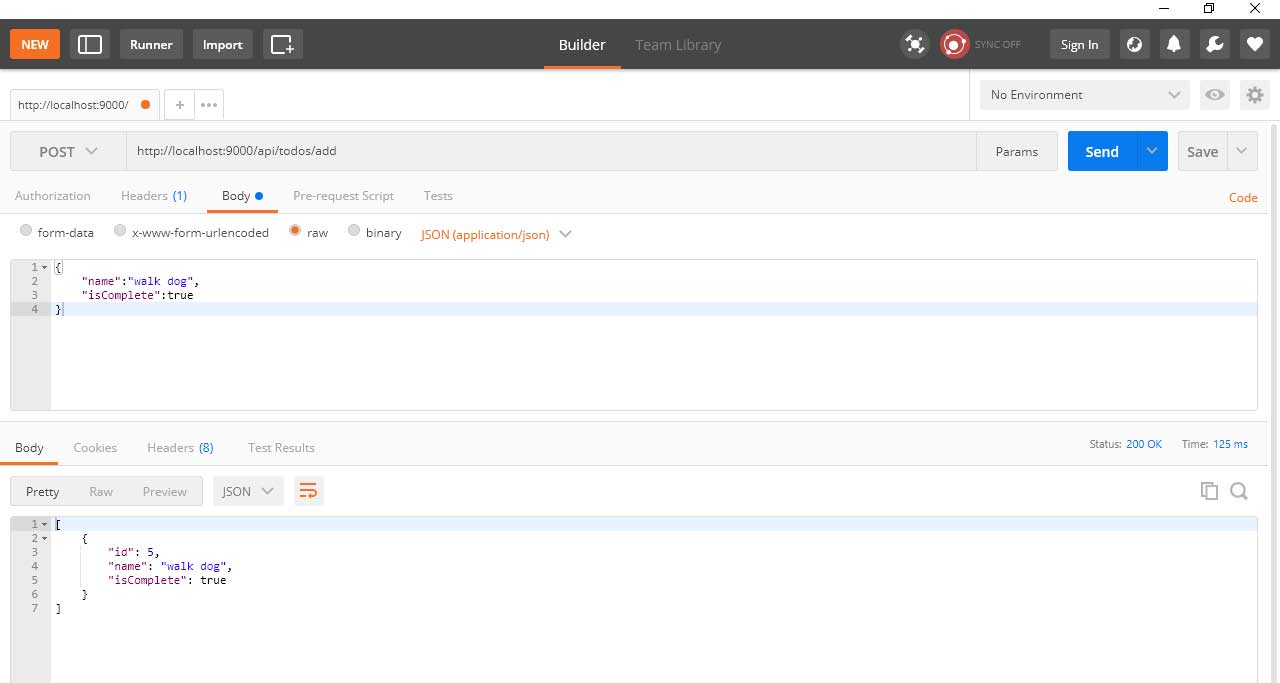
The response should return JSON that contains a list todo item. Including new one and previously created items.
Examine the GET methods
These methods implement two GET endpoints:
- GET /api/todos
- GET /api/todos/{id}
Test the app by calling the two endpoints from a browser or Postman. For example:
A response like the following is produced by the call to GetTodoItems:
JSONCopy
[{
  "id": "1",
   "name":"walk dog",
  "isComplete":true
}]Code language: JavaScript (javascript)
Test the Delete method
Use Postman to delete a to-do item:
- Set the method to DELETE.
- Set the URI of the object to delete (for example https://localhost:9000/api/todos/delete/1).
- Select Send.
The final version is available at Github in case you want to check something.
You can leave comments below for any help or confusion. I will try to address those as soon as possible. Also, you can contact iXora Solution Scala Team for any assistance on your project implementation at Contact-iXoraScala
can you please write on ZIO + Quill
very useful on a topic on which literally there is no help.