Recently we had a requirement to set up a staging server for one of our node.js applications in AWS platform. Additionally, the server should have an SSL certificate installed for two reasons,
- Testing the sandbox payment
- Keep the video streaming tool functional, as it requires an HTTPS protocol.
Although I am quite familiar with all these tasks, in a very short period, setting up a server for Node.js, enabling SSL, and configuring Route 53 was challenging. In this regard, I structure the entire process in a single article to speed up these frequent tasks.
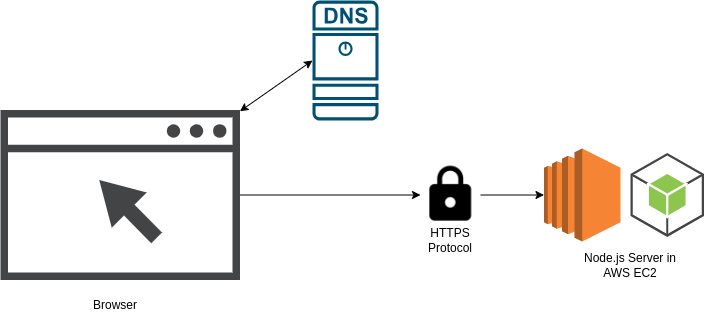
Here we will create a node.js server with an SSL certificate in AWS EC2. Also, point a domain to the server.
Create & Configure EC2 Instance
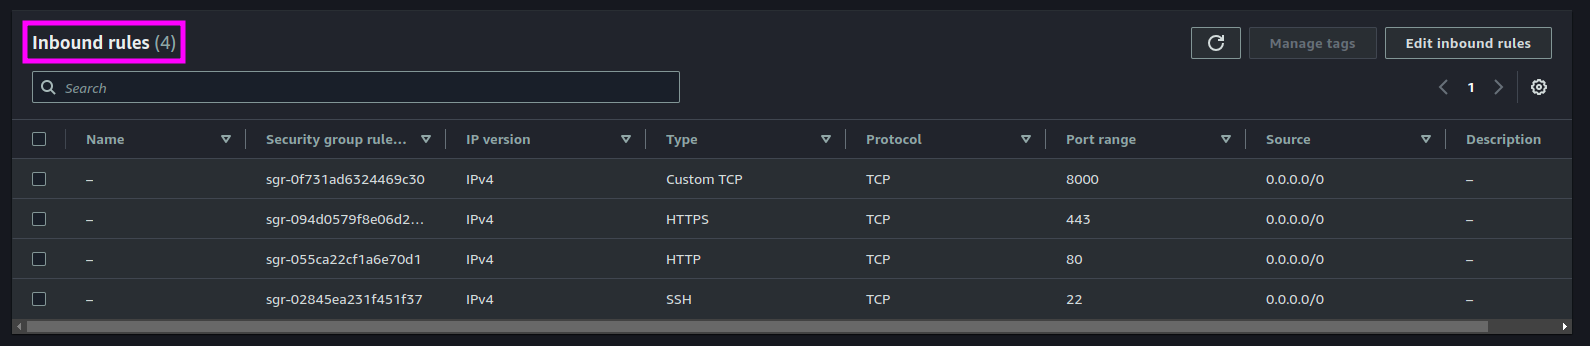
Create a EC2 instance in the AWS. For this particular article, I am using a Ubuntu-based AMI (Ubuntu 22.04) and the instance type is t3.micro. However, using it according to your requirements would be best. For the security group, make sure 443, 80, 22 and 8000 ports are open for inbound traffic. After we successfully deploy the application, only 443 port will be required to access the application.
Hopefully, you have created the instance. SSH to the instance from your local computer or use the browser to access the server.
After accessing the server using the terminal, the first task should be becoming a super user,
sudo suNow update packages of the instance,
sudo apt-get updateCode language: JavaScript (javascript)Since we are going to run the node.js app, we need to install node.js runtime in our server. Instead of directly install node.js, We will use a node version manager nvm.
To download the nvm, lets use the build download manager wget,
wget -qO- https://raw.githubusercontent.com/nvm-sh/nvm/v0.39.7/install.sh | bashCode language: JavaScript (javascript)To load the nvm version manager,
export NVM_DIR="$([ -z "${XDG_CONFIG_HOME-}" ] && printf %s "${HOME}/.nvm" || printf %s "${XDG_CONFIG_HOME}/nvm")"
[ -s "$NVM_DIR/nvm.sh" ] && \. "$NVM_DIR/nvm.sh" # This loads nvmCode language: PHP (php)
To ensure, the nvm is installed, use the following command,
source ~/.bashrc
command -v nvm
This should give an output of,
nvmNow install the latest LTS node version,
nvm install --ltsIf you need a specific version of node.js, replace --lts with the desired version. You can now run node -v to check the node.js version installed on your server.
Prepare Node.js Code in the Local Machine
To reduce the complexity, we will use a super minimal node.js server, that does not require any additional packages. Create a directory named node-js-ec2 and go to the directory,
mkdir node-js-ec2
cd node-js-ec2
Inside the directory, create a file named index.js and put the following code (you can use the nano code editor inside the terminal),
To use nano inside terminal,
nano index.jsCode language: CSS (css)Put the following code to run a minimal node.js server and type ctrl + x to close the editor.
const http = require('http');
http.createServer(function (req, res) {
  res.writeHead(200, {'Content-Type': 'text/plain'});
  res.write('Node.js app is running');
  res.end();
}).listen(8000, () => console.log('App is running on port 8000'));Code language: JavaScript (javascript)
All this code does is open a port on 8000 and on the root level / get request, return a text. To test the code locally, run,
node index.jsCode language: CSS (css)Now go to the browser and browse, http://ec2_instance_public_ip:8000/. It should say,
Node.js app is runningCode language: CSS (css)Run Node.js app in the background
Although our server is running at 8000 port, but if we close their terminal it will be stopped. To avoid this, we need to run the app in the background. To run the node.js in the background, we will utilize a tool pm2. Install pm2 globally using the the following command,
npm i -g pm2Run our node.js server in the background,
pm2 start index.jsCode language: CSS (css)This will run the app in the background and we can verify it using the instance public IP with the port 8000. To verify, browse http://instance_public_ip:8000
The browser should say,
Node.js app is runningCode language: CSS (css)Install Nginx and Run the App In Port 80
Now our application is running on port 8000. And we browse the app using an IP. Which is not user-friendly. Instead of IP, we should be able to browse that application using a domain. However, a domain can only point to the default 80 port. So, before using a domain to point to the app, we need to run the app in the default 80 port. In this case, we will use a proxy server Nginx to run it in port 80. The Nginx server will act as a proxy server. Whenever we access our server to port 80, it will redirect all our traffic to the 8000.
Now install the nginx server,
sudo apt install nginx -yStart the Nginx server,
sudo systemctl start nginxTo verify, if the Nginx the server is running, run the command,
sudo systemctl status nginxIt should say the server is running.
Now update the Nginx configuration so it will redirect all the traffic for 80 to our port 8000.
To edit the config file,
sudo nano /etc/nginx/sites-available/defaultCode language: JavaScript (javascript)For the configuration, we will use the following and update the domain you want to use in line 10.
server {
	listen 80 default_server;
	listen [::]:80 default_server;

	root /var/www/html;

	# Add index.php to the list if you are using PHP
	index index.html index.htm index.nginx-debian.html;

	server_name node-ssl.shams-nahid.com; # replace according to your url

	location / {
	    proxy_pass http://localhost:8000; # replace according to your port
	    proxy_http_version 1.1;
	    proxy_set_header Upgrade $http_upgrade;
	    proxy_set_header Connection 'upgrade';
	    proxy_set_header Host $host;
	    proxy_cache_bypass $http_upgrade;
	}
}Code language: PHP (php)
To verify if the configuration does not have any inappropriate syntax,
sudo nginx -tIt should say the test is successful.
If the configuration is okay, then restart the Nginx server,
sudo systemctl restart nginxNow our app should be available to the default port 80. After the IP, we do not need to put any additional port number. To check, just browse the public IP http://public_ip_of_instance of the instance and it should say,
Node.js app is runningCode language: CSS (css)Assign a Domain
It’s time to point the domain to the application. Go to the Route 53 and your hosted zone. Now create a record with the following configurations,
Record Name: node-ssl.shams-nahid.com # according to the nginx configuration
Record Type: A
Value: public_ip_of_the_ec2_instance
TTL: 300 (default)
Routing Policy: Simple routing (default)Code language: PHP (php)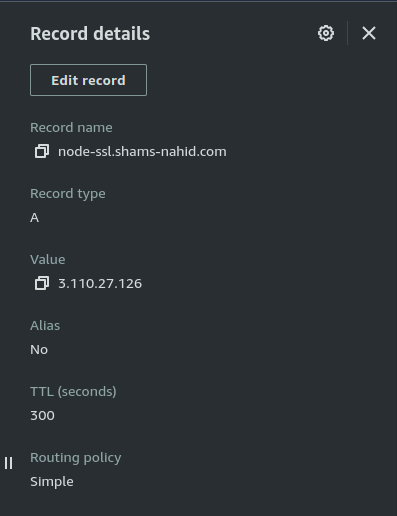
Now, if I browse http://node-ssl.shams-nahid.com, I should again see the following,
Node.js app is runningCode language: CSS (css)Install SSL Certificate
Now our app is running on http protocol, which is not secure, and every time it is visited, the browser will show a flag on top left, that the site is not secure. To make the site under https protocol we will install a SSL certificate. So the server will be served through the https protocol from the internet.
Let’s Encrypt is a site that provides free SSL certificates. We will use the SSL certificate from there. To install and renew the certificate, we will use the tool Certbot. To install Certbot we will use snap package manager. Install the package manager,
sudo snap install coreRefresh snap the manager,
sudo snap refresh coreIf any old version of the certbot is already installed, remove it by,
sudo apt remove certbot -yNow, install a fresh updated certbot,
sudo snap install --classic certbotTo make the certbot system-wide available by creating a link,
sudo ln -s /snap/bin/certbot /usr/bin/certbotTime to grab the SSL certificate (make sure to replace the URL according to yours),
sudo certbot --nginx -d node-ssl.shams-nahid.comCode language: CSS (css)This will ask you to send an email for further notification, like renewing time. Later ask to agree with their terms and conditions. You have to interact through the terminal.
After that, in the browser, we should be able to access the site with https protocol. To test, browse https://shams-nahid.com and the browser should display,
Node.js app is running
Enable auto-renew when the cert is expired,
sudo systemctl status snap.certbot.renew.serviceCode language: CSS (css)This will ensure, your SSL certificate auto-renew after expiry.
Conclusion
Right now, you should have a node.js app running in the AWS ec2 instance with a domain and SSL certificate. For any query or questions feel free to comment below or contact iXora Solution expert teams.
Have specific project requirements? Personalized or customized software solutions! You can contact iXora Solution expert teams for any consultation or coordination from here. We are committed to maximizing your business growth with our expertise as a custom software development and offshore solutions provider. Let’s make your goals a reality.
Thanks for your patience!
Add a Comment